BHW Group Blog
AngularJS and HTML Form Design - Part 2
Submitted by Clayton Anderson on Wednesday, 08/27/14
Introduction
Welcome back! In this series, we are exploring how to design HTML forms with AngularJS, with the best user experience in mind. If you missed part 1, you can find that here. In part 2, we will take a deeper look at a couple more complicated validation scenarios.
A Quick Note about Submitted CSS
Forms in AngularJS 1.3 are getting a built-in feature very similar to the way we set up our submitted boolean and CSS in part 1. You can take a look at the github commit if you're interested in seeing how they integrated it with the framework. 1.3 is still in beta, so I'm going to stick with 1.2 for part 2, but I have changed the submitted class name to ng-submitted to match how AngularJS 1.3 will work.
...
<form class="form-demo" ng-submit="submit()" ng-class="{ 'ng-submitted': submitted }" name="contactForm" novalidate>
...
</form>
...
...
.ng-submitted input.ng-invalid {
    border: 1px solid #f00;
    background-color: #fee;
}
...
I also got a great comment on reddit after part 1 went up about not repeating the submitted check in each of the validation messages. I made a small CSS change to factor out the submitted check in each of the validation messages.
...
.form-demo:not(.ng-submitted) .validation-message {
    display: none;
}
...
On to the article!
Step 1. Conditional Validation
At the end of part 1, this is what our contact object looked like.
{
    firstName: '',
    lastName: '',
    email: ''
}
The firstName and lastName fields were required, with a max length of 20 characters. The only rule on the email field was that it had to be a valid email address.
Let's repurpose our contact form a bit by making it a newsletter sign-up form. After adding a boolean to track whether the contact wants to receive emails, our object looks like this.
{
    firstName: '',
    lastName: '',
    receiveEmails: false,
    email: ''
}
All of our inputs so far have been text (or email, which is very similar to text) fields. Adding a checkbox to track the new receiveEmails boolean is as easy as adding an input element with the type attribute set to "checkbox".
...
<div>
    <label>
        <input type="checkbox" name="receiveEmails" ng-model="newContact.receiveEmails" />
        I want to receive emails
    </label>
</div>
...
Here's what that looks like.
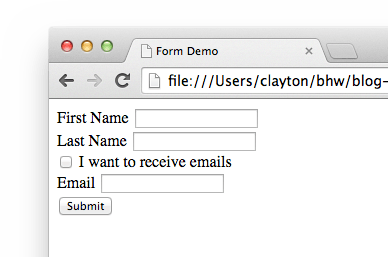
Now we can require an email address, but only if the user wants to receive emails. They should still be able to enter an address either way though, and the email validation should still apply. AngularJS makes this easy to do. Remember how we added the required attribute to the firstName and lastName elements? AngularJS provides the ng-required directive, which you can pass an expression to. If the expression is truthy, then the field will be required.
...
<div>
    <label>
        Email
        <input type="email" name="email" ng-model="newContact.email" ng-required="newContact.receiveEmails" />
        <span class="validation-message" ng-show="contactForm.email.$error.email">
            Invalid email
        </span>
        <span class="validation-message" ng-show="contactForm.email.$error.required">
            Required
        </span>
    </label>
</div>
...
In our case, we are passing newContact.receiveEmails to the ng-required directive. Since our checkbox is bound to that boolean, the validation will immediately recognize when it has changed and make the field required or not.
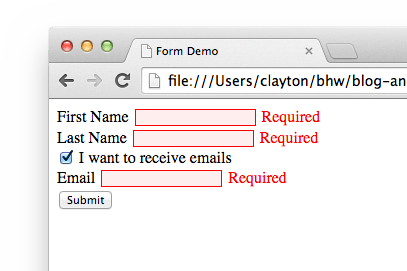
Go ahead and give it a try. Our existing email validation works as before, but now the field is conditionally required. Notice that we added another validation message for when the email is required.
Step 2. Repetition
What if we wanted to submit multiple contacts at once? Before we get to the view, let's make a quick controller change. Instead of tracking a single newContact object, now we want an array of contacts.
(function() {
    'use strict';

    var module = angular.module('form-demo');

    function ContactController($scope, $window, Contact) {
        function success() {
            $window.alert('Contacts saved successfully!');
        }

        function failure() {
            $window.alert('Oops!');
        }

        $scope.contacts = [];
        $scope.submitted = false;
        $scope.submitting = false;

        $scope.addContact = function() {
            $scope.contacts.push({});
        };

        $scope.removeContact = function(index) {
            $scope.contacts.splice(index, 1);
        };

        $scope.submit = function() {
            $scope.submitted = true;

            if ($scope.contactForm.$valid) {
                $scope.submitting = true;
                Contact.save($scope.contacts)
                    .then(success, failure)
                    .then(function() {
                        $scope.submitting = false;
                    });
            } else {
                $window.alert('Please fix any validation errors and try again.');
            }
        };
    }

    module.controller('ContactController', ['$scope', '$window', 'Contact', ContactController]);
}());
Not too much changed here. We've removed the newContact object, added a contacts array, and added two functions for adding and removing from the array - both published on the scope. addContact will add an empty contact, and removeContact removes the contact at the passed in index. We'll call both of these functions from our view.
Since our backend is just a timeout statement, we don't need to make any changes to our factory for this demo page.
Let's update our view to use an ng-repeat. This directive allows us to make minimal changes to our HTML, but gives our form the ability to handle any number of contacts. ng-repeat is one of the most important parts of AngularJS, so if you are interested in reading more about it, the AngularJS documentation is a good starting point.
...
<form class="form-demo" ng-submit="submit()" ng-class="{ 'ng-submitted': submitted }" name="contactForm" novalidate>
    <div ng-repeat="contact in contacts">
        <strong>Contact {{ $index }}</strong>
        <button type="button" ng-click="removeContact($index)">Remove</button>

        <div>
            <label>
                First Name
                <input type="text" name="firstName" ng-model="contact.firstName" required ng-maxlength="20" />
                <span class="validation-message" ng-show="contactForm.firstName.$error.required">
                    Required
                </span>
                <span class="validation-message" ng-show="contactForm.firstName.$error.maxlength">
                    Max length 20
                </span>
            </label>
        </div>

        <div>
            <label>
                Last Name
                <input type="text" name="lastName" ng-model="contact.lastName" required ng-maxlength="20" />
                <span class="validation-message" ng-show="contactForm.lastName.$error.required">
                    Required
                </span>
                <span class="validation-message" ng-show="contactForm.lastName.$error.maxlength">
                    Max length 20
                </span>
            </label>
        </div>

        <div>
            <label>
                <input type="checkbox" name="receiveEmails" ng-model="contact.receiveEmails" />
                I want to receive emails
            </label>
        </div>

        <div>
            <label>
                Email
                <input type="email" name="email" ng-model="contact.email" ng-required="contact.receiveEmails" />
                <span class="validation-message" ng-show="contactForm.email.$error.email">
                    Invalid email
                </span>
                <span class="validation-message" ng-show="contactForm.email.$error.required">
                    Required
                </span>
            </label>
        </div>

        <br />
    </div>

    <div>
        <button type="button" ng-click="addContact()">Add contact</button>
        <button type="submit" ng-disabled="submitting" ng-switch="submitting">
            <span ng-switch-default>Submit</span>
            <span ng-switch-when="true">Submitting...</span>
        </button>
    </div>
</form>
...
Here's what we changed. The inputs have now been wrapped with a div with an ng-repeat on it. Each iteration of the contacts collection is aliased as contact, so all the places in our view that referenced newContact before are now contact. Each iteration has a button to remove that contact, and a label showing the index (Note that we use $index here - this is a feature of ng-repeat. AngularJS provides a number of other special properties.) Also, we added a button at the bottom to add a contact to the array.
For now, the page starts with no contacts in the collection. In the real world, we would probably want to have one empty contact object already added to the array.
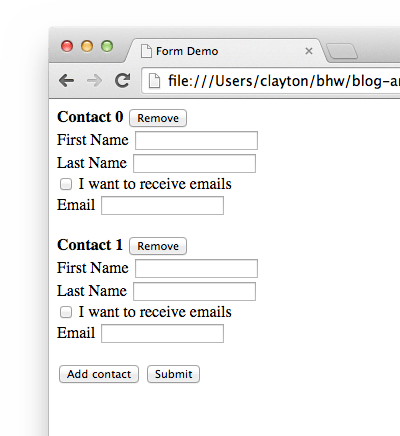
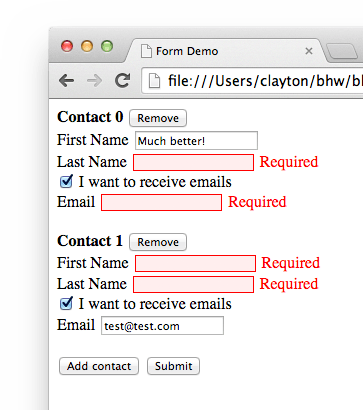
Here's what the page should look like right now, after adding a couple contacts.
Something isn't quite right though. If you play around with the validation, you'll notice that when there are multiple contacts, the validation messages show up at times they shouldn't.
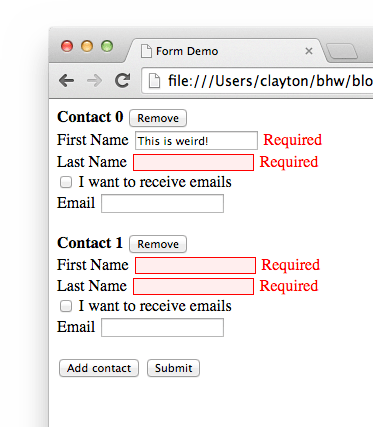
In this screenshot, the "Required" message is showing up for the first contact's first name, despite the field being filled out. What is going on here?
Take a look at one of our validation messages.
...
<span class="validation-message" ng-show="contactForm.firstName.$error.required">
    Required
</span>
...
Our ng-show expression is referencing contactForm.firstName. Spot the issue? Now that our firstName input repeats, with the same name each time, our ng-show expression no longer references the validation of a single firstName, but rather the validation of each firstName. Try filling out the fields for the second contact and you'll see that the required messages appear and disappear for all contacts at once.
So what can we do here? If you come from a jQuery background, your first thought is probably to dynamically assign names to the inputs based on what iteration they are in. AngularJS provides a more idiomatic way, through the use of ng-form.
With ng-form we can create a separate form instance for each iteration of our ng-repeat.
...
<form class="form-demo" ng-submit="submit()" ng-class="{ 'ng-submitted': submitted }" name="contactForm" novalidate>
    <div ng-repeat="contact in contacts" ng-form="repeatForm">
        <strong>Contact {{ $index }}</strong>
        <button type="button" ng-click="removeContact($index)">Remove</button>

        <div>
            <label>
                First Name
                <input type="text" name="firstName" ng-model="contact.firstName" required ng-maxlength="20" />
                <span class="validation-message" ng-show="repeatForm.firstName.$error.required">
                    Required
                </span>
                <span class="validation-message" ng-show="repeatForm.firstName.$error.maxlength">
                    Max length 20
                </span>
            </label>
        </div>

        <div>
            <label>
                Last Name
                <input type="text" name="lastName" ng-model="contact.lastName" required ng-maxlength="20" />
                <span class="validation-message" ng-show="repeatForm.lastName.$error.required">
                    Required
                </span>
                <span class="validation-message" ng-show="repeatForm.lastName.$error.maxlength">
                    Max length 20
                </span>
            </label>
        </div>

        <div>
            <label>
                <input type="checkbox" name="receiveEmails" ng-model="contact.receiveEmails" />
                I want to receive emails
            </label>
        </div>

        <div>
            <label>
                Email
                <input type="email" name="email" ng-model="contact.email" ng-required="contact.receiveEmails" />
                <span class="validation-message" ng-show="repeatForm.email.$error.email">
                    Invalid email
                </span>
                <span class="validation-message" ng-show="repeatForm.email.$error.required">
                    Required
                </span>
            </label>
        </div>

        <br />
    </div>

    <div>
        <button type="button" ng-click="addContact()">Add contact</button>
        <button type="submit" ng-disabled="submitting" ng-switch="submitting">
            <span ng-switch-default>Submit</span>
            <span ng-switch-when="true">Submitting...</span>
        </button>
    </div>
</form>
...
Each iteration's form is now aliased as repeatForm. If you open up the demo page the validation should be working correctly now, for each contact. One of the awesome things about this is that when AngularJS checks form validity, it will check any nested ng-forms. So in our controller, when we check $scope.contactForm.$valid, it automatically checks the validity of each contact without us needing to make a single code change!
Conclusion
That wraps up our AngularJS form design series. I hope this series helped you begin or progress your AngularJS journey! It certainly doesn't have to be the end though, here's a few ideas you could explore next.
- Learn the full set of built-in AngularJS validation attributes
- Create your own validation rules with custom directives
- Hook up a service / factory to a REST API
Do you need an expert in web development? With a team of web development specialists covering a wide range of skill sets and backgrounds, The BHW Group is prepared to help your company make the transformations needed to remain competitive in today’s high-tech marketplace.