BHW Group Blog
Accessing iPhone Camera Roll Images with React Native
Submitted by Carly Kubacak on Tuesday, 08/04/15
Intro
React Native is a framework for iPhone app development that uses native elements for the user interface and JavaScript to run and define the application logic. The framework exposes a subset of native iOS elements and also allows developers to create new, custom modules to perform actions that are not supported by the framework out of the box. The open source community has created a number of custom modules (icons, image picker, camera, etc.) that can be easily added to any React Native project.
There are multiple ways to access iPhone images using built-in React Native controls and custom modules. In this guide, I’ll cover how to use the React Native CameraRoll API to display a user's camera roll images and get the base64 encoded version of an image when it is selected. If you don’t have an existing React Native project, you can follow this guide to get started.
Camera Roll API + Upload From Camera Roll Module
This approach uses the built-in React Native Camera Roll API to display existing camera roll images to the user. Once the user selects an image, we’ll use the Upload From Camera Roll Module to get the base64 image data from the selected image. You should use this approach if you want to control how your users will see and select images. If you also want your users to be able to take an image using the camera, you can add this camera module. If you don't want to customize how users view and select images, you might want to use the Image Picker Module available on github.
Import the CameraRoll API from React.
const React = require('react-native');

const {
    CameraRoll,
} = React;
Use the CameraRoll getPhotos function to get a list of images.
CameraRoll.getPhotos accepts 3 parameters: an object that defines which images to return from the camera roll, a callback function that receives the requested images, and a callback function to handle errors. First, let's look at the object that defines which images are returned. It has the following properties:
{
    first: ..., // (required) The number of photos wanted in reverse order of the photo application
    after: ..., // A cursor returned from a previous call to 'getPhotos'
    groupTypes: ..., // Specifies which group types to filter the results to
                     // One of ['Album', 'All', 'Event', 'Faces', 'Library', 'PhotoStream', 'SavedPhotos'(default)]
    groupName: ..., // Specifies filter on group names, like 'Recent Photos' or custom album titles
    assetType: ... // Specifies filter on assetType
                   // One of ['All', 'Videos', 'Photos'(default)]
}
For our example, let's just grab the first 25 images in the camera roll. Our first parameter for the getPhotos function will look like this:
const fetchParams = {
    first: 25,
}
Next, we'll define the callback function that processes the received images. The data passed to the callback function from CameraRoll.getPhotos contains an array of nodes with image data and an object that contains paging information. The returned object takes the following shape:
{
    edges: [
        node: {
            type: ...,
            group_name: ...,
            image: {
                uri: ...,
                height: ...,
                width: ...,
                isStored: ...,
            },
            timestamp: ...,
            location {
                ...
            },
        },
        node: { ... },
        node: { ... },
        ...
    ],
    page_info:  {
        has_next_page: ...,
        start_cursor: ...,
        end_cursor: ...,
    }
}
Since the image object contains the data we'll need to display the images in our app, lets create a function that will extract the image object from the edges array. We should also store the extracted image data as a state variable.
storeImages(data) {
    const assets = data.edges;
    const images = assets.map( asset => asset.node.image );
    this.setState({
        images: images,
    });
 },
Since we created a new state variable for the image data, we need to define the intial value of that variable.
getInitialState() {
    return {
        images: [],
    };
},
The final parameter for our getPhotos function is a callback that will handle errors. For this example, we'll just log the error to the console.
logImageError(err) {
    console.log(err);
},
Now we have defined all of the parameters for the CameraRoll.getPhotos function! We'll call this function in ComponentDidMount() so that the images are only retrieved once.
componentDidMount() {
    const fetchParams = {
        first: 25,
    };
    CameraRoll.getPhotos(fetchParams, this.storeImages, this.logImageError);
},
Render the images
We can use the Image component, flexbox styling, and another map function to display the retrieved images in our app.
Let's add the StyleSheet and Image components to our React imports:
const {
    CameraRoll,
    StyleSheet,
    Image,
} = React;
Then we can add a render function to our component that displays the images.
render() {
    return (
        <ScrollView style={styles.container}>
            <View style={styles.imageGrid}>
            { this.state.images.map(image => <Image style={styles.image} source={{ uri: image.uri }} />) }
            </View>
        </ScrollView>
    );
  }
... and then add styling.
const styles = StyleSheet.create({
    container: {
        flex: 1,
        backgroundColor: '#F5FCFF',
    },
    imageGrid: {
        flex: 1,
        flexDirection: 'row',
        flexWrap: 'wrap',
        justifyContent: 'center'
    },
    image: {
        width: 100,
        height: 100,
        margin: 10,
    },
});
At this point, your component should look like this:
const React = require('react-native');

const {
  StyleSheet,
  Text,
  View,
  ScrollView,
  Image,
  CameraRoll,
} = React;

const styles = StyleSheet.create({
  container: {
    flex: 1,
    backgroundColor: '#F5FCFF',
  },
  imageGrid: {
    flex: 1,
    flexDirection: 'row',
    flexWrap: 'wrap',
    justifyContent: 'center'
  },
  image: {
    width: 100,
    height: 100,
    margin: 10,
  },
});

const reactImageProject = React.createClass({
  getInitialState() {
    return {
      images: [],
    };
  },

  componentDidMount() {
    const fetchParams = {
      first: 25,
    };
    CameraRoll.getPhotos(fetchParams, this.storeImages, this.logImageError);
  },

  storeImages(data) {
    const assets = data.edges;
    const images = assets.map((asset) => asset.node.image);
    this.setState({
      images: images,
    });
  },

  logImageError(err) {
    console.log(err);
  },

  render() {
    return (
      <ScrollView style={styles.container}>
        <View style={styles.imageGrid}>
          { this.state.images.map((image) => <Image style={styles.image} source={{ uri: image.uri }} />) }
        </View>
      </ScrollView>
    );
  }
});
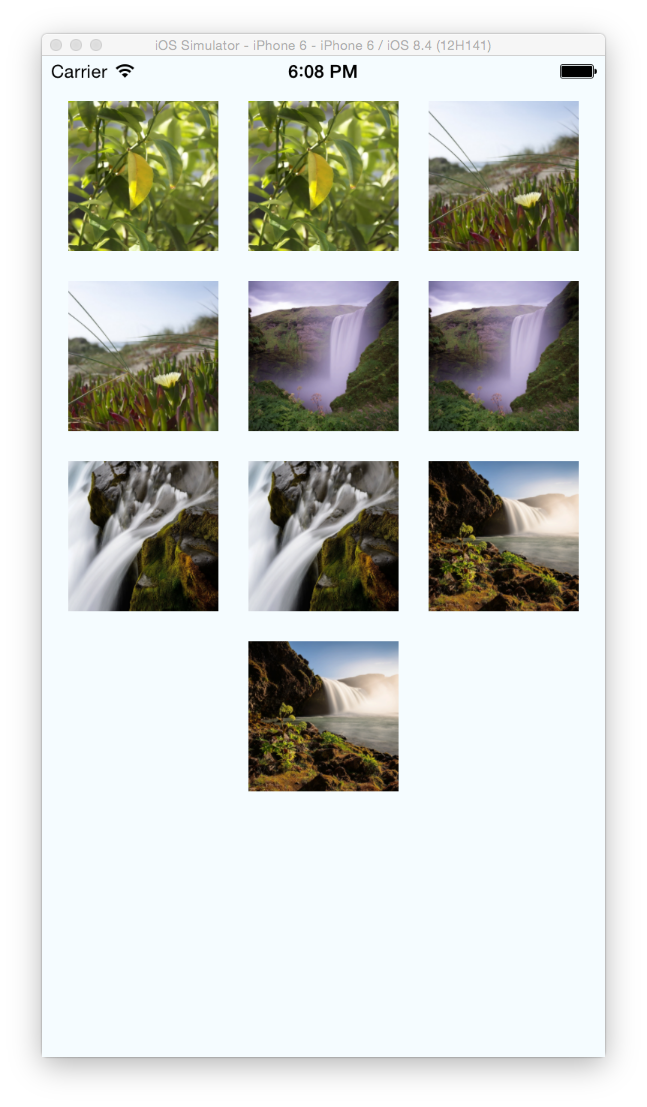
And now, when you run the project, you should see a grid of the first 25 camera roll images! (or at least as many as are in your camera roll).
Select an image
To allow the user to select an image, we need to make the images clickable. We can surround the images in a TouchableHighlight component and add an onPress event that saves the image uri in another state variable.
The following function will save the passed in string to the component's 'selected' state variable and log it to the console:
selectImage(uri) {
  this.setState({
    selected: uri,
  });
  console.log('Selected image: ', uri);
},
We also need to add a default value for the new state variable in getInitialState()
getInitialState() {
  return {
    images: [],
    selected: '',
  };
},
And now we can import TouchableHighlight and update our render function to use the new selectImage function.
const {
  StyleSheet,
  Text,
  View,
  ScrollView,
  Image,
  CameraRoll,
  TouchableHighlight,
} = React;

render() {
  return (
    <ScrollView style={styles.container}>
      <View style={styles.imageGrid}>
        { this.state.images.map((image) => {
            return (
              <TouchableHighlight onPress={this.selectImage.bind(null, image.uri)}>
                <Image style={styles.image} source={{ uri: image.uri }} />
              </TouchableHighlight>
            );
          })
        }
      </View>
    </ScrollView>
  );
}
When you run the project now, you should see a black box appear around any image that you press and a message in the console with that image's uri.
Get the base64 encoded version of the selected image
There is an existing module that uses the React Native Image component to get the base64 version of the image. Unfortunately, it's not available through NPM, so we'll just add it to the project as if we were creating the custom module. Follow the instructions here to include the upload-from-camera-roll module in your project.
NOW we can use that module to get the base64 encoded version of the image from the uri. We can change our selectImage function to save and log the encoded version of the image instead of the uri:
selectImage(uri) {
    NativeModules.ReadImageData.readImage(uri, (image) => {
        this.setState({
            selected: image,
        });
        console.log(image);
    });
},
The final component should look (something) like this!
const React = require('react-native');

const {
    AppRegistry,
    StyleSheet,
    Text,
    View,
    ScrollView,
    Image,
    CameraRoll,
    TouchableHighlight,
    NativeModules,
} = React;

const styles = StyleSheet.create({
    container: {
        flex: 1,
        backgroundColor: '#F5FCFF',
    },
    imageGrid: {
        flex: 1,
        flexDirection: 'row',
        flexWrap: 'wrap',
        justifyContent: 'center'
    },
    image: {
        width: 100,
        height: 100,
        margin: 10,
    }
});

const reactImageProject = React.createClass({
    getInitialState() {
        return {
            images: [],
            selected: '',
        };
    },

    componentDidMount() {
        const fetchParams = {
            first: 25,
        };
        CameraRoll.getPhotos(fetchParams, this.storeImages, this.logImageError);
    },

    storeImages(data) {
        const assets = data.edges;
        const images = assets.map((asset) => asset.node.image);
        this.setState({
            images: images,
        });
    },

    logImageError(err) {
        console.log(err);
    },

    selectImage(uri) {
        NativeModules.ReadImageData.readImage(uri, (image) => {
            this.setState({
                selected: image,
            });
            console.log(image);
        });
    },

    render() {
        return (
            <ScrollView style={styles.container}>
                <View style={styles.imageGrid}>
                { this.state.images.map((image) => {
                    return (
                        <TouchableHighlight onPress={this.selectImage.bind(null, image.uri)}>
                        <Image style={styles.image} source={{ uri: image.uri }} />
                        </TouchableHighlight>
                    );
                    })
                }
                </View>
            </ScrollView>
        );
    }
});

AppRegistry.registerComponent('reactImageProject', () => reactImageProject);