BHW Group Blog
Converting an AngularJS website into a Cordova app on iOS and Android
Submitted by Taylor Smith on Monday, 07/27/15
Cordova is Apache's tool to convert a web application into a native application. It supports all of the major mobile operating systems and provides the ability to use native features like the camera, device status, and file system. There are a few frameworks out there that build off of this including Ionic and Phonegap. If you've heard of Phonegap, you may be familiar with this concept. Cordova is the framework that phonegap uses and as of writing this there is essentially very little difference between the two. If you want more specifics about the difference, the ionic blog talks more about the details. This guide will focus on Cordova specifically but the steps may be similar for other frameworks. This guide is also intended to focus on how to convert an existing app into a native app by using Cordova but again may be helpful for building an app from scratch.
The Apache Cordova website has an intro on how to use the command line interface to start building an app from scratch. This guide is great for getting Cordova running. There are several things that need to be installed before you can begin creating an app and their guide covers the majority of the setup process. For our application we focused on Android and iOS and so I will only cover steps pertaining to these two operating systems. As a general outline of things that you need to install you can follow this list:
- Install npm first, it will be used to install other things.
- Install Cordova and AngularJS.
- Install xCode if you are on mac.
- Install an android ide (either Android Studio or Eclipse, I chose Android Studio).
- Install the sdk you want to use. Or install multiple sdks if you want/need them.
- Make sure you add android to the path.
- For me, since I used Android Studio on mac, the library was located in the
/Users/<username>/Library/Android/sdkfolder. I used the following commands to add this to the path:export ANDROID_HOME=/Users/<username>/Library/Android/sdk/export PATH=${PATH}:$ANDROID_HOME/tools:$ANDROID_HOME/platform-tools - Depending on the version the paths might be slightly differenct so you will have to research that for your set up and version.
- For me, since I used Android Studio on mac, the library was located in the
- If you want to add other platforms you must download the correct tools for development with that platform.
Once you have all of this set up you can create a test application by running the command:
cordova create test com.tsmith.test Test
If this succeeds you can begin adding platforms with this syntax:
cordova platforms add ios
cordova platforms add android
In order to test these you can use the emulators that come with the development tools. These emulators can be used to test with many different devices and allow you to test builds to make sure that your app works. The default cordova app will not really do anything but it will allow you to make sure that you have everything set up properly. If it works properly the app will run and it will display a message indicating that the Cordova has connected to the device properly. The commands for running the emulators are:
cordova emulate ios
cordova emulate android
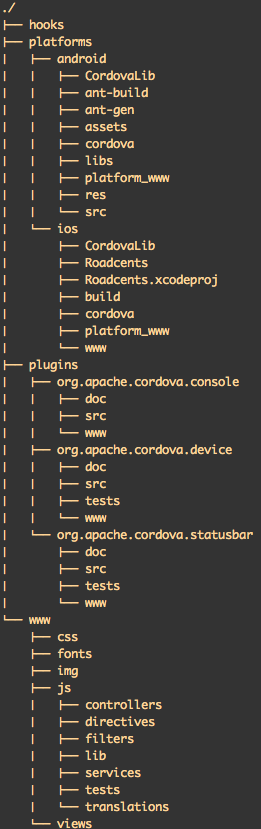
Once you reach this point it is fairly straight forward to copy your code over. There are a few directories that you should be aware of in order to accomplish this though. At the project directory level you will see the www folder. This is where all of the code goes that would normally be in your web app. In this example I have it organized for an angular application but you can organize this based on the needs of your application. No files are shown here but in the www directory I also have an index.html file as the base of the application.
Platform Specific Code via Merges
If you look in the platforms directories you will see a folder for each platform label platform_www. This folder and its contents are built by Cordova. Making changes in these directories will NOT change the application specific code. It will be erased every time you build the application. By default Cordova no longer adds a merges directory but if you want to add platform specific code you would do so through this directory. Simply add a merges directory at the project level and specify any platform specific code within this folder.
Loose Ends
At this point your app should be working on multiple devices. There are however a few gotchas to look out for. When developing, ensure that links are not local links. Links may need a full url to function since it is not a typical server hosted application. Also be sure to check all relative links for the same reason. Creating an app isolates these references and you need to thoroughly test to ensure that all links work properly. One other big thing to look for is the status bar. Every platform uses different status bar styles and apps can individually affect the status bar. Be sure to check out the status bar plugin and be aware of the options that are available when designing your app.
Deploying
By using the emulators you can test the app to make sure it works but at some point you will want to test on a real device. The platform specific folders contain all of the code necessary to deploy your applications. Simply follow the standard instructions for the desired platform to deploy your app. The Cordova project has great guides on various platforms that detail the process better than this article can cover. With these steps you should be well on your way to android, iOS, and other apps built straight from your angularJs code.